
Ask any AV installer what separates a smooth project from a painful one, and a clean cable schedule will be near the top of the list. When the cabling is documented properly, terminations go fast, troubleshooting is straightforward, and the as-built handoff actually means something. When it isn’t, every pull becomes a guessing game.
An AV cable schedule is the single document that ties your entire signal infrastructure together. It tells the installation team exactly which cables run where, what type they are, how long they need to be, and how each end is labeled. Done right, it doubles as a punch list, a troubleshooting reference, and an as-built record.

In this guide, we’ll walk through what an AV cable schedule actually contains, the columns you should always include, and the conventions that separate professional documentation from a glorified spreadsheet.
What Is an AV Cable Schedule?
An AV cable schedule is a structured table that lists every cable in an AV system, with all the information needed to pull, label, terminate, and test it. Each row represents a single cable run. Each column represents a piece of information about that run — source, destination, cable type, length, and so on.
Think of it as the audio-visual equivalent of an electrical pull schedule or a network patch list. It’s not a drawing — it’s a tabular companion to your signal flow diagrams, floor plans, and rack elevations. Together, they make up a complete AV documentation package.
A good cable schedule lets a technician walk into a job, find Cable AV-0142, and know exactly what it is, where it starts, where it ends, and what type of connector it terminates into — without having to flip back to a signal flow diagram.
Why Every AV Project Needs a Cable Schedule
It’s tempting to skip the cable schedule on smaller projects. After all, a single conference room with a display, a soundbar, and a wall plate “doesn’t need” a 50-row spreadsheet. But even on small jobs, a basic schedule pays for itself.
Faster Installation
When the install team has a clear list of cable runs with lengths and types pre-calculated, they can pre-stage cables, prep terminations in batches, and avoid the constant “what cable goes here?” interruptions.
Cleaner Terminations
A schedule that includes connector type at each end (e.g., “RJ45 at source, terminated wall plate at destination”) prevents the wrong-connector problem that costs hours on every project.
Easier Troubleshooting
When a display goes dark six months after install, the cable schedule lets a service tech instantly identify the cable, trace it on the drawings, and start diagnosing — instead of pulling ceiling tiles to chase wires.
Better As-Built Documentation
Updating the cable schedule during installation gives you an accurate as-built without separate paperwork. When the project closes, the schedule becomes a permanent record of what was actually installed.
What to Include in an AV Cable Schedule
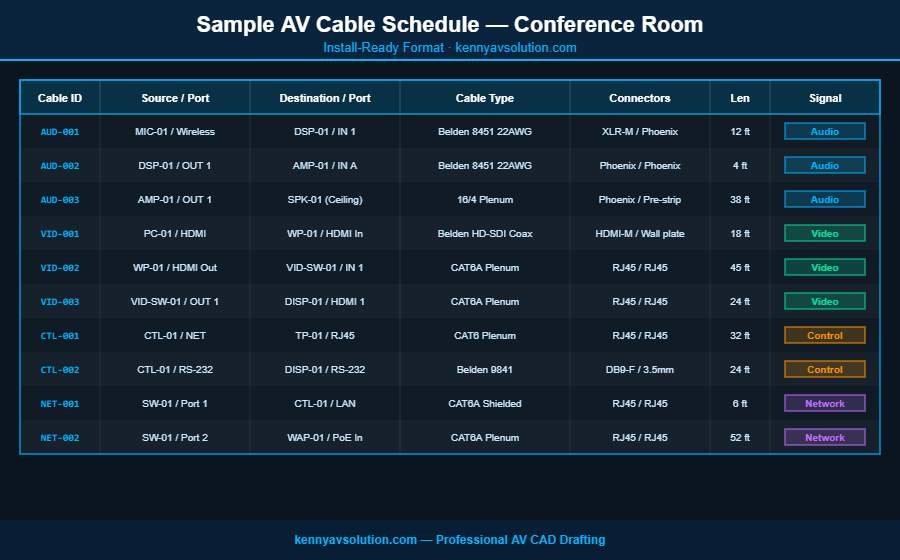
A well-structured AV cable schedule has the right columns — not too many, not too few. Here’s what every schedule should capture:
1. Cable ID / Tag
A unique identifier for every cable, following a consistent naming convention. For example: AV-001, AV-002, etc. Some firms prefix by signal type (e.g., AUD-001 for audio, VID-001 for video, CTL-001 for control). Whatever scheme you pick, use it consistently across the project.
2. Source Device + Port
Which device the cable starts at, and which physical port. Use the same device tags as your signal flow diagram (e.g., DSP-01, VID-SW-01) so technicians can cross-reference instantly. Include the port: “Output 3,” “HDMI Out,” “Mic Input 1.”
3. Destination Device + Port
The same information for the other end of the cable. The combination of source and destination should fully describe the run.
4. Cable Type
The exact cable specification — for example, Belden 1694A RG6 Coax, CAT6A Plenum, 16/4 Speaker Wire, Mogami W2549 Mic. Generic descriptions like “video cable” lead to wrong cables being pulled. Be specific.
5. Connector Type (Both Ends)
How each end terminates: RJ45, HDMI Male, XLR Female, Phoenix 3-pin, Wall Plate Insert. If both ends are different (very common), list both.
6. Cable Length
The estimated length of the run, including service loops. Round up generously — short cables are useless. Include units (feet or meters) and stay consistent across the schedule.
7. Pathway / Routing
Where the cable physically runs: J-Hook above ceiling, Conduit A1, Cable Tray North, Wall chase to rack. This becomes critical during install and even more critical during troubleshooting.
8. Signal Type
What the cable carries: Audio, Video, Control, Data, Power. This often determines pathway separation requirements (e.g., audio away from power runs).
9. Label Format
How each end of the cable should be physically labeled in the field. Many firms use a format like [Cable ID] [Source] -> [Destination] printed on heat-shrink or wrap-around labels.
10. Notes / Status
A free-text column for special instructions (“test with fluke before termination”) or status tracking (“pulled,” “terminated,” “tested”).
AV Cable Schedule Naming Conventions
Naming conventions are where most cable schedules go wrong. Pick a system on day one and apply it ruthlessly. A few rules of thumb:
Sequential Numbering Within Categories
Use prefixes that group cables logically. For example:
AUD-001throughAUD-099for audio cablesVID-001throughVID-099for video cablesCTL-001throughCTL-099for control cablesNET-001throughNET-099for network cables
Match Device Tags to the Signal Flow Diagram
If your signal flow diagram calls a device DSP-01, your cable schedule should say DSP-01 — not “the QSC processor” or “main DSP.” Inconsistency between drawings and schedules is the single biggest source of installer confusion.
Avoid Spaces and Special Characters
Cable IDs that contain spaces or symbols can cause issues with label printers and database imports. Stick to letters, numbers, and dashes.
Use Leading Zeros
Use AV-001, not AV-1. This keeps everything sortable alphabetically and looks professional in a printed schedule.
Common Mistakes to Avoid
Even experienced AV teams make a handful of cable schedule mistakes that compound across a project. Here are the ones we see most often:
Skipping the Length Column
“We’ll measure on site” is not a strategy. Without estimated lengths, the materials list is wrong, cable inventory is wrong, and the install timeline slips.
Generic Cable Type Descriptions
Listing “Cat 6” without specifying plenum, riser, shielded, or solid/stranded leads to wrong cable being ordered or pulled. Same goes for “speaker wire” — gauge and conductor count matter.
Missing Connector Information
If the schedule doesn’t say “RJ45 male at source, keystone jack at destination,” the technician has to guess. They’ll guess wrong sometimes.
No Cross-Reference to Drawings
If your cable schedule doesn’t tie back to specific drawing sheets, technicians have to manually match every row to a diagram. Add a Drawing Sheet or Reference column.
Treating It as a One-Time Document
The cable schedule should evolve through design, procurement, install, and as-built. A static schedule that’s only updated once is not nearly as useful as one that’s actively maintained throughout the project lifecycle.
Tools for Building AV Cable Schedules
You have a few options for actually creating and maintaining your cable schedule:
Spreadsheet (Excel or Google Sheets)
The simplest and most flexible option. Works for any size project, easy to share, and most installers can edit it on site. Downside: no automatic linking back to drawings.
Purpose-Built AV Software
Tools like D-Tools and XTEN-AV can auto-generate cable schedules from your equipment list and signal flow diagram. This eliminates manual data entry and keeps everything in sync. See our breakdown in Best AV CAD Software in 2026 for a comparison.
AutoCAD with Custom Templates
For firms already standardized on AutoCAD, custom block attributes can populate cable schedules directly from the drawing data. More setup up front, but very tight integration with the rest of your documentation package.
How the Cable Schedule Fits Into the Larger AV Documentation Package
The cable schedule is one piece of a complete AV design documentation set. It works hand-in-hand with:
- Signal flow diagrams that show the logical signal path between devices — see our guide to AV signal flow diagrams
- Floor plans and reflected ceiling plans that show physical equipment locations
- Rack elevations that show how rack-mounted gear is laid out
- Equipment schedules that list every device, model number, and quantity
- Conduit and pathway drawings that show how cables physically route
For a deeper look at how all these pieces fit together, check out our breakdown of the complete AV design documentation package. Following standardized symbols across all of these — see our AVIXA AV drawing symbols quick reference — keeps the entire package internally consistent.
Let Kenny AV Solution Build Your Cable Schedules
Creating a clean, install-ready AV cable schedule takes time, attention to detail, and experience with how cables actually get pulled in the field. If your team is stretched between design and installation work, outsourcing the documentation can free up significant capacity.
At Kenny AV Solution, we produce professional AV cable schedules as part of our complete CAD drafting service — fully cross-referenced to signal flow diagrams, equipment schedules, and floor plans. Every schedule we deliver is install-ready, AVIXA-aligned, and built to make your installation team’s life easier.
Ready to streamline your AV documentation? Contact Kenny AV Solution today and let’s talk about your next project.