
An AV site survey is the half day that decides whether your drawings describe the building or describe the drawings. Architectural files tell you what was designed. A survey tells you what got built — the beam that is not on the plan, the ceiling that is 300 mm lower than documented, the conduit that was capped behind the wall. This guide covers when a survey is worth the trip, what to capture while you are there, and how to hand it over so the drafting team can actually use it.
When a site survey is worth the trip
Not every project needs one. Survey when any of these are true:
- The building already exists. Retrofits and refresh projects are where surveys pay for themselves, every time.
- The drawings are old, incomplete, or of unknown provenance. A 2009 floor plan with no revision history is a starting point, not a source of truth.
- You are reusing existing infrastructure — conduit, cable, racks, displays, structured cabling. You cannot document what you have not looked at.
- There is no as-built set from whoever installed the previous system, which is the usual situation.
- The scope includes structural or overhead mounting, where what is above the ceiling decides what is possible.
On new construction in an active build, a survey is less about measuring and more about timing — walking the space at rough-in tells you what the ceiling void really contains before it closes up.
Before you go
A survey without preparation turns into a second survey. Read the drawings first and go in with specific questions rather than a blank pad.
Take the current architectural backgrounds printed at a usable scale, the equipment list or draft design, a laser distance meter, a tape for the short measurements the laser will not take, a torch, a ladder or the site contact who has one, and a camera you are willing to use several hundred times. Confirm access in advance — ceiling access, rack room access, riser access, and whoever holds the keys.
Mark up the printed plans as you walk. Notes that live only in your head do not survive the drive home.
What to capture in every room
Work to a consistent list so nothing is decided by whether you happened to think of it that day.
- Room dimensions, measured rather than scaled off the plan, plus ceiling height and floor-to-structure height.
- Wall construction — drywall, block, glass, movable partition — because it decides how anything gets mounted and whether cable can be fished.
- Existing displays, speakers, cameras, plates and control devices, with mounting heights and positions dimensioned from a fixed reference, not from furniture.
- Power: outlet locations, circuit information where you can get it, and whether there is any dedicated AV power.
- Existing data outlets, their labelling, and where they terminate.
- Doors, windows, columns and anything that blocks a sightline or a cable route.
- Furniture and seating layout if it is fixed, because it sets viewing distances and microphone coverage.
- Obstructions — the fire alarm strobe exactly where the display goes, the sprinkler head over the projector position, the beam behind the wall you planned to mount to.
Dimension from something permanent. A device located 2.1 m from a wall corner can be found again; a device located “behind the sideboard” cannot.
The ceiling is where surveys fail
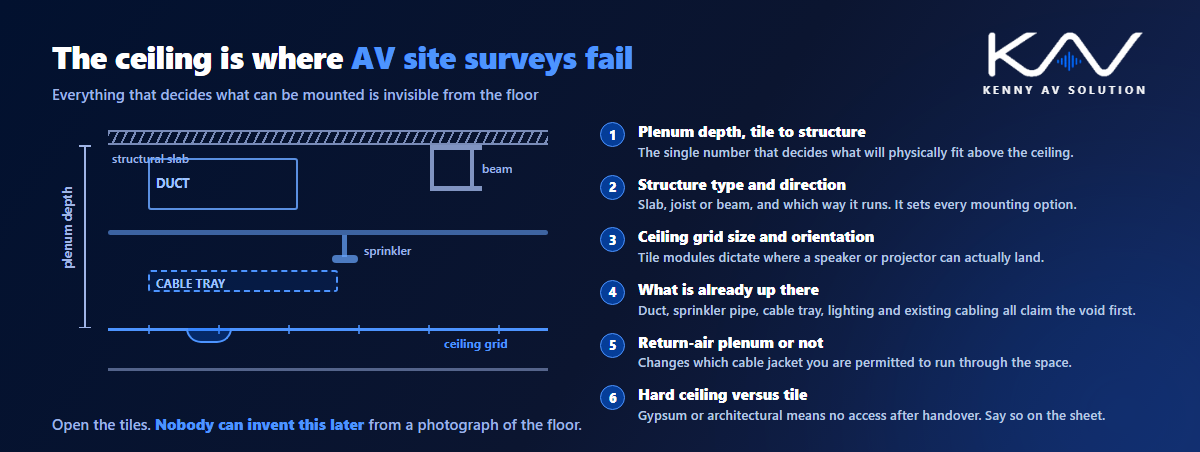
More AV surprises live above the ceiling than anywhere else in the building, and it is the one place people skip because it needs a ladder.
Open the tiles. Record the plenum depth from tile to structure, the structure type and direction, the ceiling grid size and orientation, and what is already up there — ductwork, sprinkler pipe, cable tray, lighting, existing cabling. Note whether the space is a return-air plenum, because that changes which cable you are allowed to run. If the ceiling is hard, gypsum or architectural rather than tile, say so plainly: access after handover will be difficult and that changes the design.
This is the information that feeds the reflected ceiling plan, and it is the information nobody can invent later from a photograph of the floor.
Existing infrastructure and pathways
If the project reuses anything, the survey has to document it properly. For racks: location, size, how full, what is in them, power available, ventilation, and how much clearance exists front and rear. For pathways: conduit runs you can trace, their size, whether they are already occupied, pull box and floor box locations, and the route between floors. For cable: type, condition, labelling, and where each end actually lands rather than where the label claims.
Conduit is worth the most effort. Establishing that an existing pathway is genuinely usable saves the electrical scope it would otherwise cost, and it is the input the conduit and riser diagrams are built from.
Photographs that are still useful three months later
Photograph more than feels reasonable. Storage is free; a return trip is not.
For each room, shoot all four walls, the ceiling with tiles open, the floor, and a wide shot from the main viewing position. Then shoot the detail: every existing device, every outlet, every label, every serial plate. Put something of known size in shots where scale matters.
The part people skip is naming. Photos named IMG_4417 are worthless to a drafter who was not there. Rename by room as you go, or at minimum shoot a card or a phone note with the room name before each room so the sequence is self-describing. A photo log that maps image numbers to rooms takes ten minutes on site and saves hours later.
Turning the survey into drawings
The survey is only worth what survives the journey to the drawing board. Write it up the same day, while you still remember which room had the low soffit.
A usable handover to whoever is drafting contains: marked-up plans, the measurements with their reference points, the photographs with a log, the ceiling and pathway notes, and an explicit list of discrepancies between the drawings and the building. That last list is the one that matters — flag every difference rather than quietly correcting it, so the change is visible to the architect and the client rather than buried in your file. It is the same reasoning behind documented drawing standards: what is recorded can be checked, and what is silently fixed cannot.
If the drafting is done by an outsourced team or a partner in another country, this handover is the site visit. Send the marked-up plans, the photo set and the discrepancy list together, and expect questions back before drawing starts — a good drafter asking what is above the ceiling in room 204 is doing exactly the right thing. Pair it with the coordination described in AV trade coordination so the survey findings reach the other trades too.
Frequently asked questions
How long does an AV site survey take? Roughly 20 to 45 minutes per room for a detailed survey, less for repetitive spaces once you have established the pattern, plus time for rack rooms, risers and pathway tracing. Write-up typically takes about a third of the time spent on site.
Do I need a site survey if I have architectural drawings? On an existing building, yes. Drawings record the design intent; buildings record what the contractor actually did, plus twenty years of changes nobody documented. On new construction the drawings are more reliable, but a walk at rough-in is still worth the time.
What is the most commonly missed item on an AV site survey? What is above the ceiling. Plenum depth, structure and existing services decide what can be mounted and how cable is routed, and they are invisible from the floor.
Can AV drawings be produced without a site survey? Yes, from architectural backgrounds and an equipment list, and that is normal on new build. The set should then state clearly that it is not field-verified, so nobody treats provisional dimensions as measured ones.
What should I send to an outsourced drafting team after a survey? Marked-up plans, measurements with their reference points, a named photo set with a log, ceiling and pathway notes, and a written list of every discrepancy between the drawings and the building.
Need your survey turned into a drawing set?
Kenny AV Solution produces complete AV drawing sets in AutoCAD for integrators, consultants and contractors worldwide — floor plans and RCPs, rack elevations, signal flow, cable schedules and as-builts, drawn from your survey notes, markups and photographs to your standards and your title block. Send what you captured on site and we will tell you what else we need. See our AV CAD drafting services, grab the free AV CAD Drafting Standards Checklist, or schedule a quick call — we come back with a quote and timeline within one business day. For the wider documentation standards that survey data eventually feeds into, AVIXA is the reference worth having on the shelf.